Brad Nierenberg Gets a Lesson in Tamale Making

Brad Nierenberg Gets a Lesson in Tamale Making

What a treat! A dear friend from Honduras called and invited me to come over for the day to make Tamales with her and her mom who was visiting from Honduras. I jumped at the chance and man oh man am I happy I did!

IMG_4291

I think most people are familiar with Mexican Tamales. But according to my friend most Spanish-speaking countries have their own version of the savory treat. In Honduras they are typically prepared for Christmas. That’s probably because they really do take an entire day to make.

Rather than listing all the ingredients and then instructions, it will be easier for you to follow along if I break the steps up into sections. I apologize in advance for not listing specific measurements. My friend and her mom did not have a written recipe, nor did we measure anything. After generations of Tamale-making, it’s just one of those recipes they know by “feel” and “taste.”

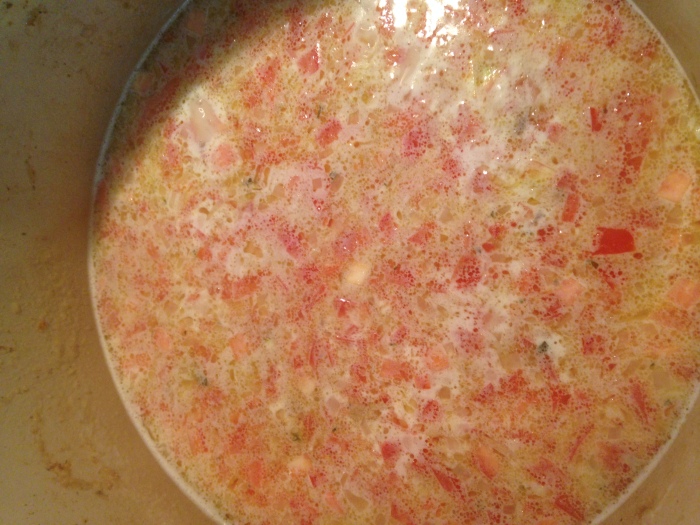
Step One – Preparing the Pork
Start with a 3-5 pound piece of pork. We used a boneless tenderloin, but a bone-in piece is fine. Cut the meat into chunks about 2”x2”. Brown the pieces of pork in some chopped onion, crushed garlic, and oil.

IMG_4278

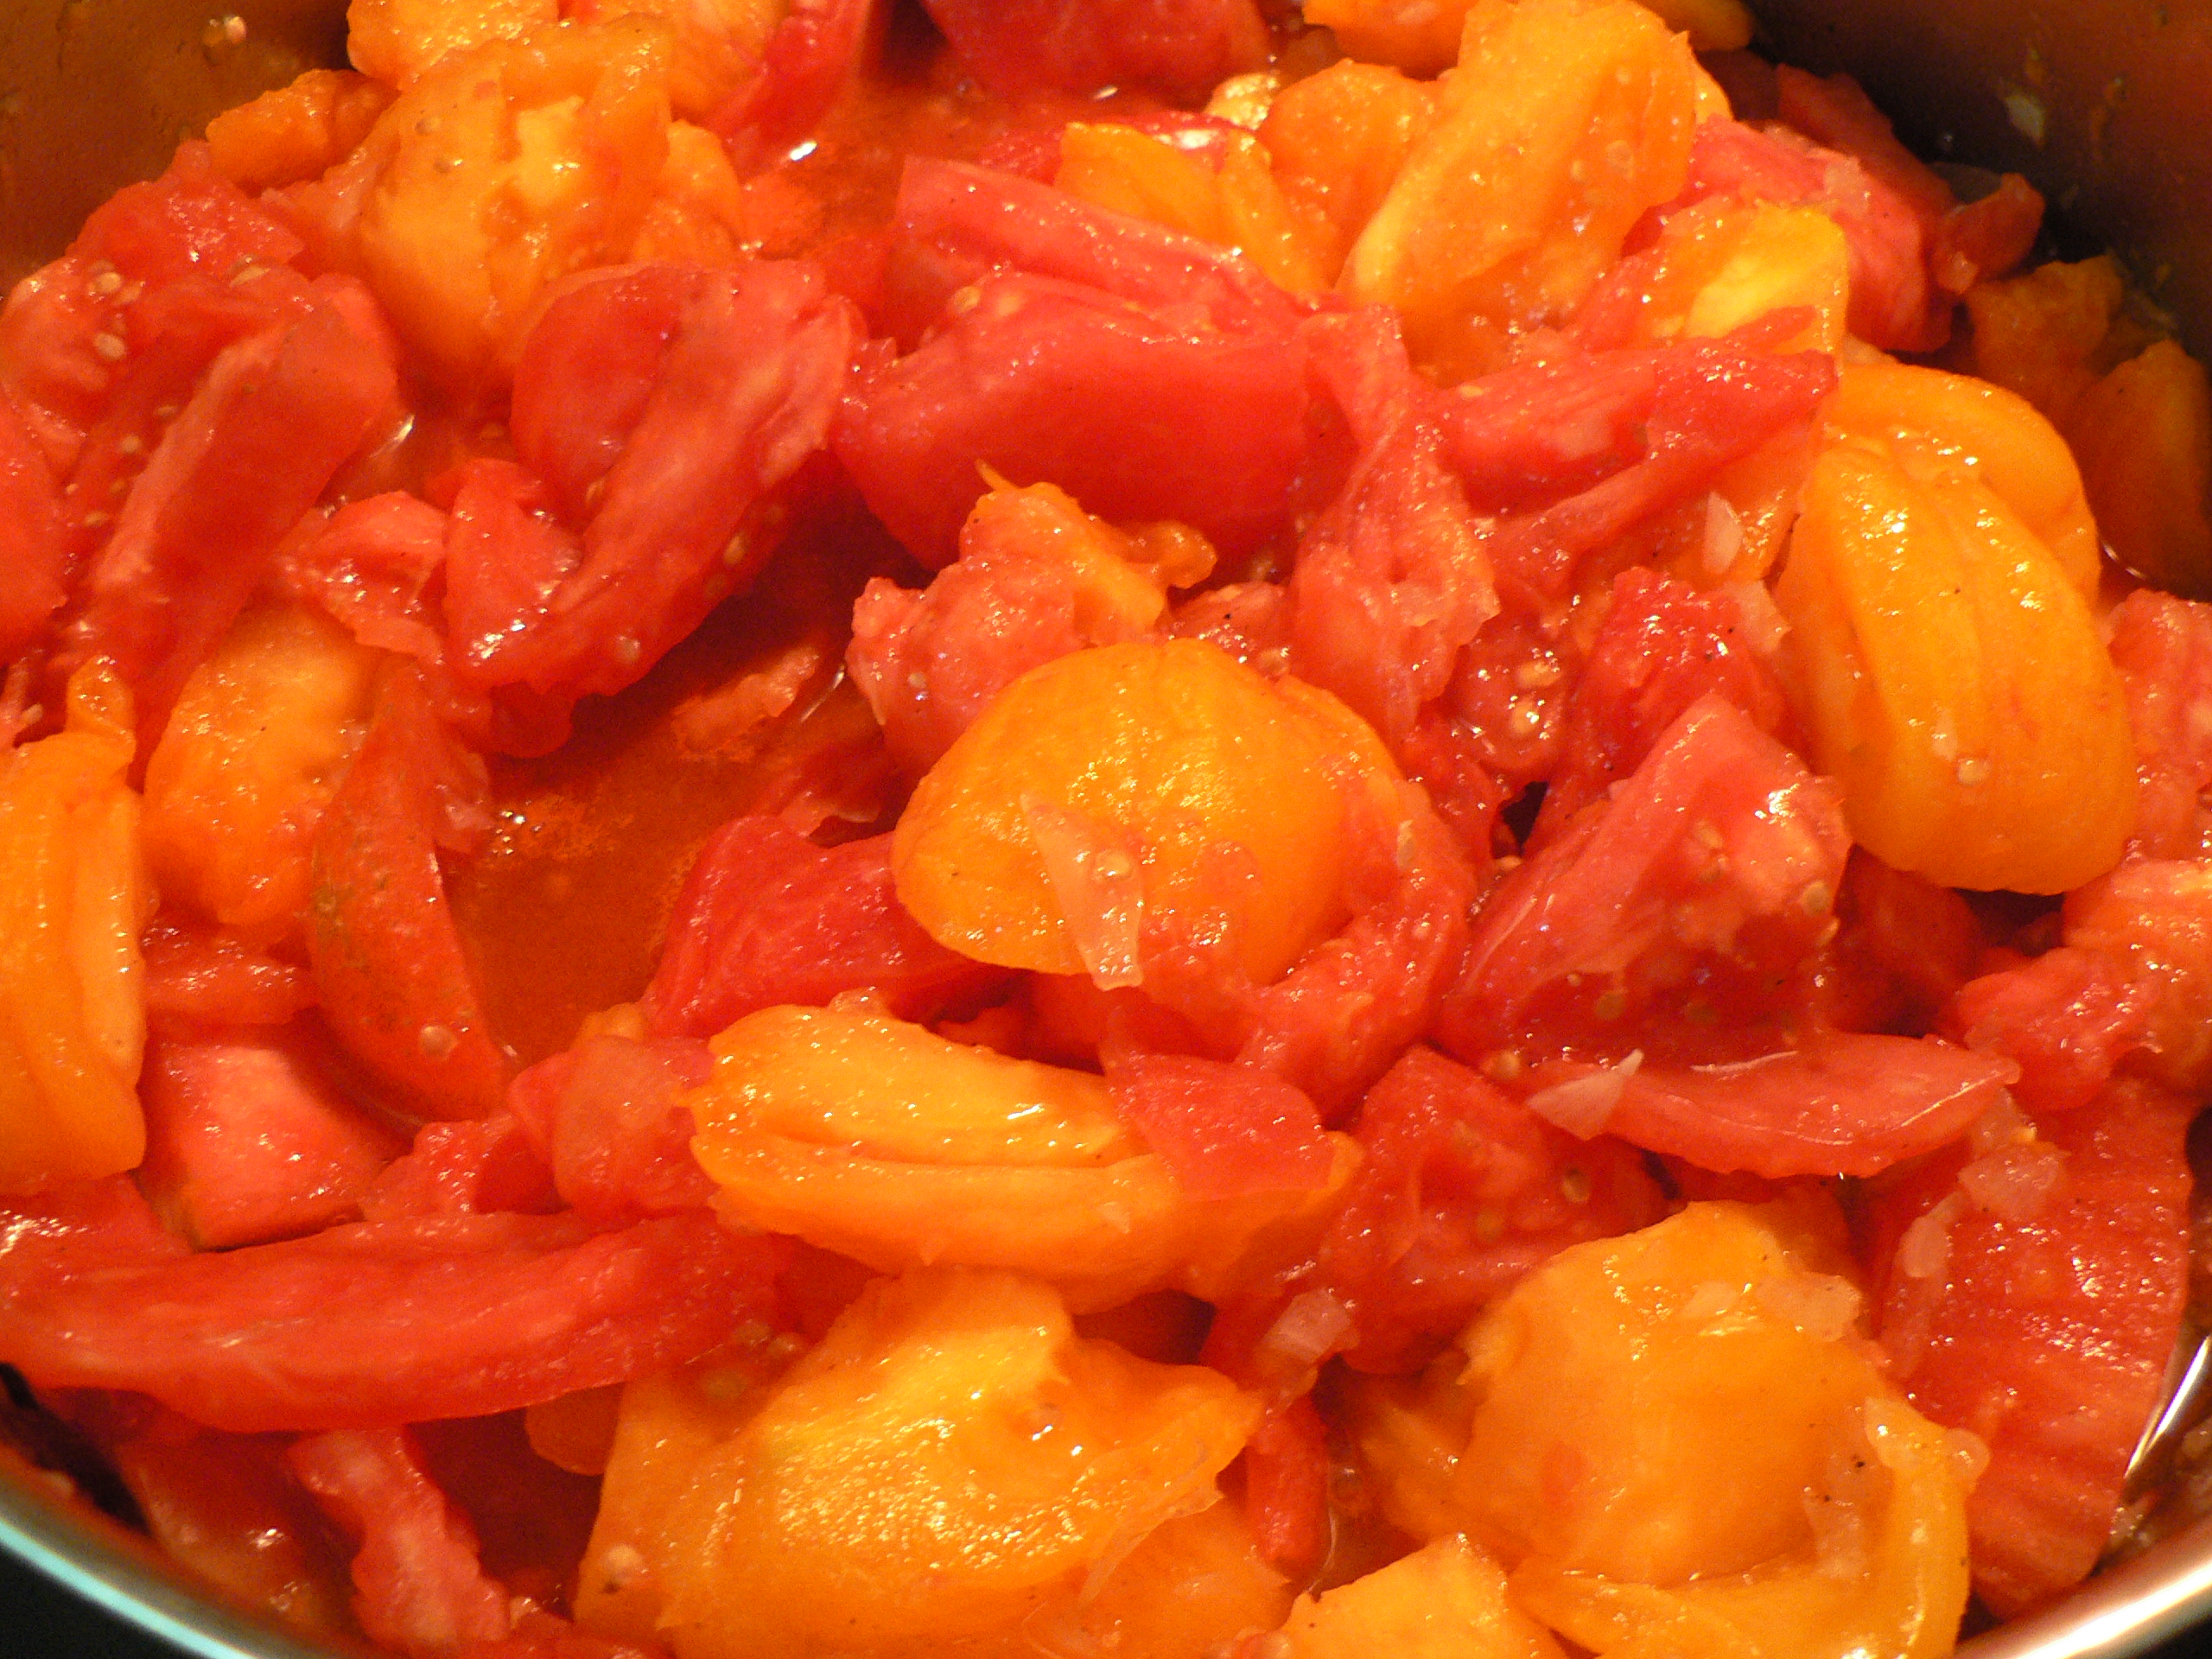
Puree 4 roma tomatoes, 1 onion, 1 green pepper, 4 cloves of garlic, adobo seasoning, cumin, Worcestershire sauce, and cilantro in a blender or food processor. Pour over meat and simmer for 30 minutes. Add a small can of tomato paste and continue to simmer until tender. Taste and adjust for seasoning.

Sidenote: I was super surprised they used Worcestershire sauce in their cooking. My friends actually referred to it as sauce of the English. Ha, ha!

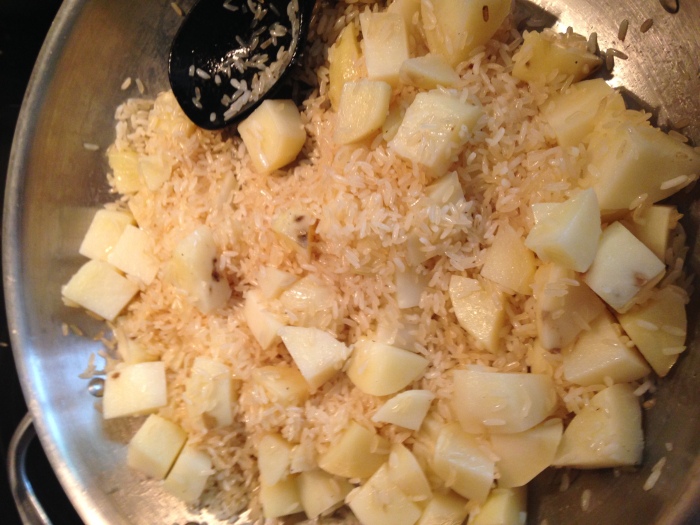
Step Two – Brown the Rice and Potatoes
Peel and cube 1-2 potatoes into 1” sized pieces or smaller. (Not too tiny or they will fall apart in the Tamale.) In a frying pan brown 1-1/2 cups rice and the potato cubes together in butter, oil, or a bit of each until the potatoes are softened.

IMG_4276

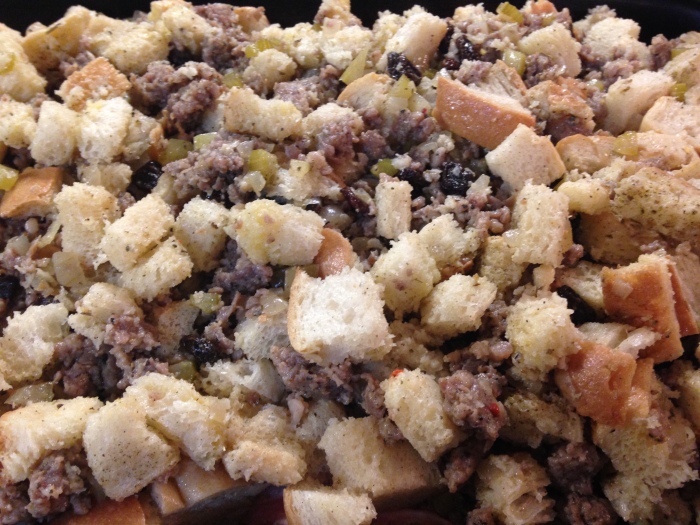
Step Three – Cook the Cornmeal
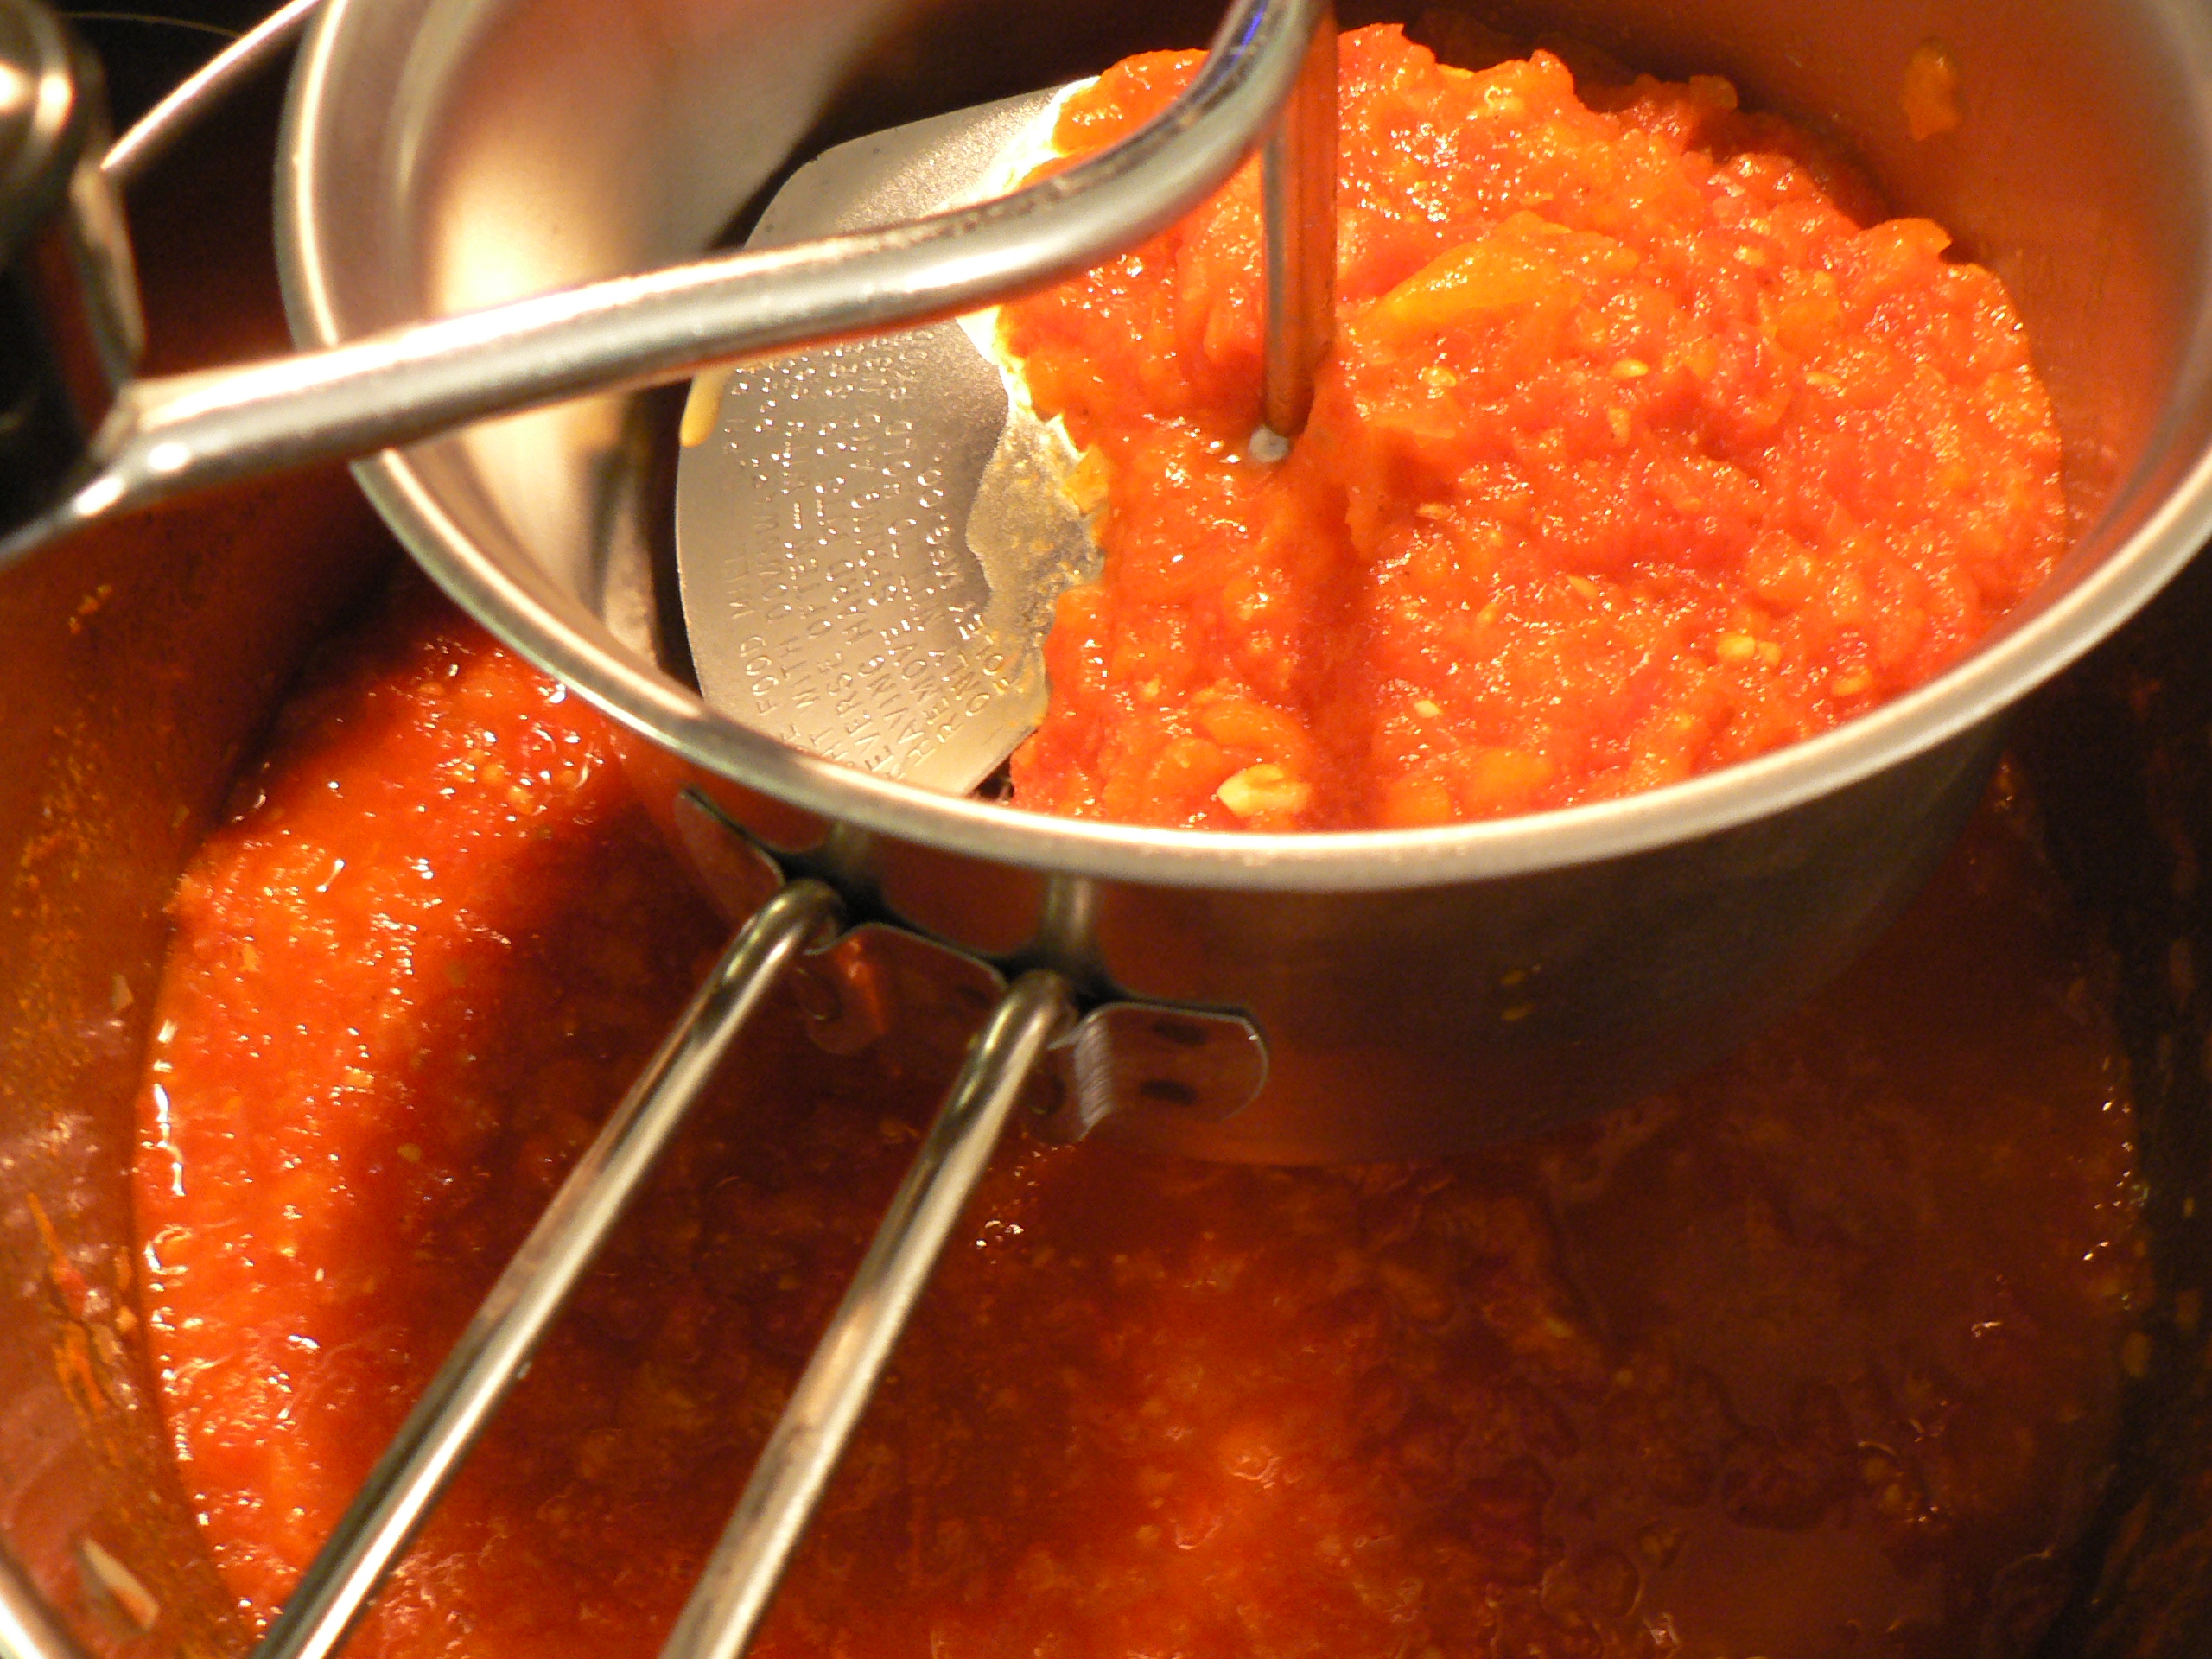
Pour a small bag (or half of a larger bag) of cornmeal into a large pot. In the blender, puree 4 roma tomatoes, 1 onion, 1 green pepper, 4 cloves garlic, adobo seasoning, cumin, and Worcestershire sauce. Pour it into the pot of cornmeal. Add all the juice from one jar Spanish olives and all the juice from one jar of capers. Add about 1 cup of water and 1 cup oil. Add 1-2 packets of achiote (also called annatto) powder for color. Mix by hand. Keep adding small amounts of water until it mixes more easily, but is not too soupy or runny. You may want to add another 1/2 to 1 cup of oil. This will keep it from lumping while cooking.

IMG_4279

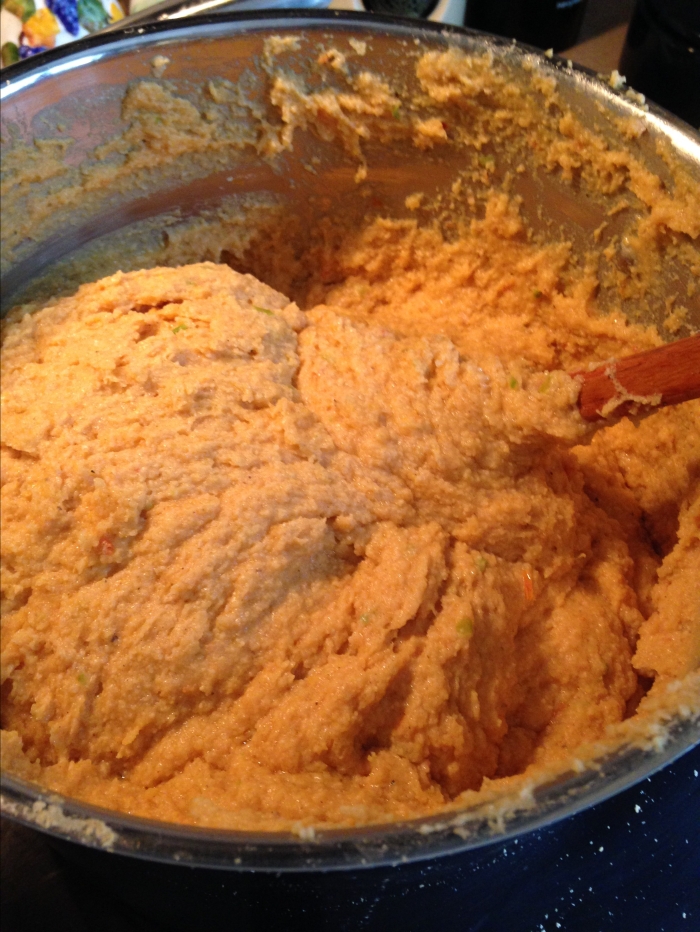
Taste for seasoning and adjust. It should be flavorful and not too bland.

Cook on medium heat while constantly stirring until thickened and with a slight sheen.

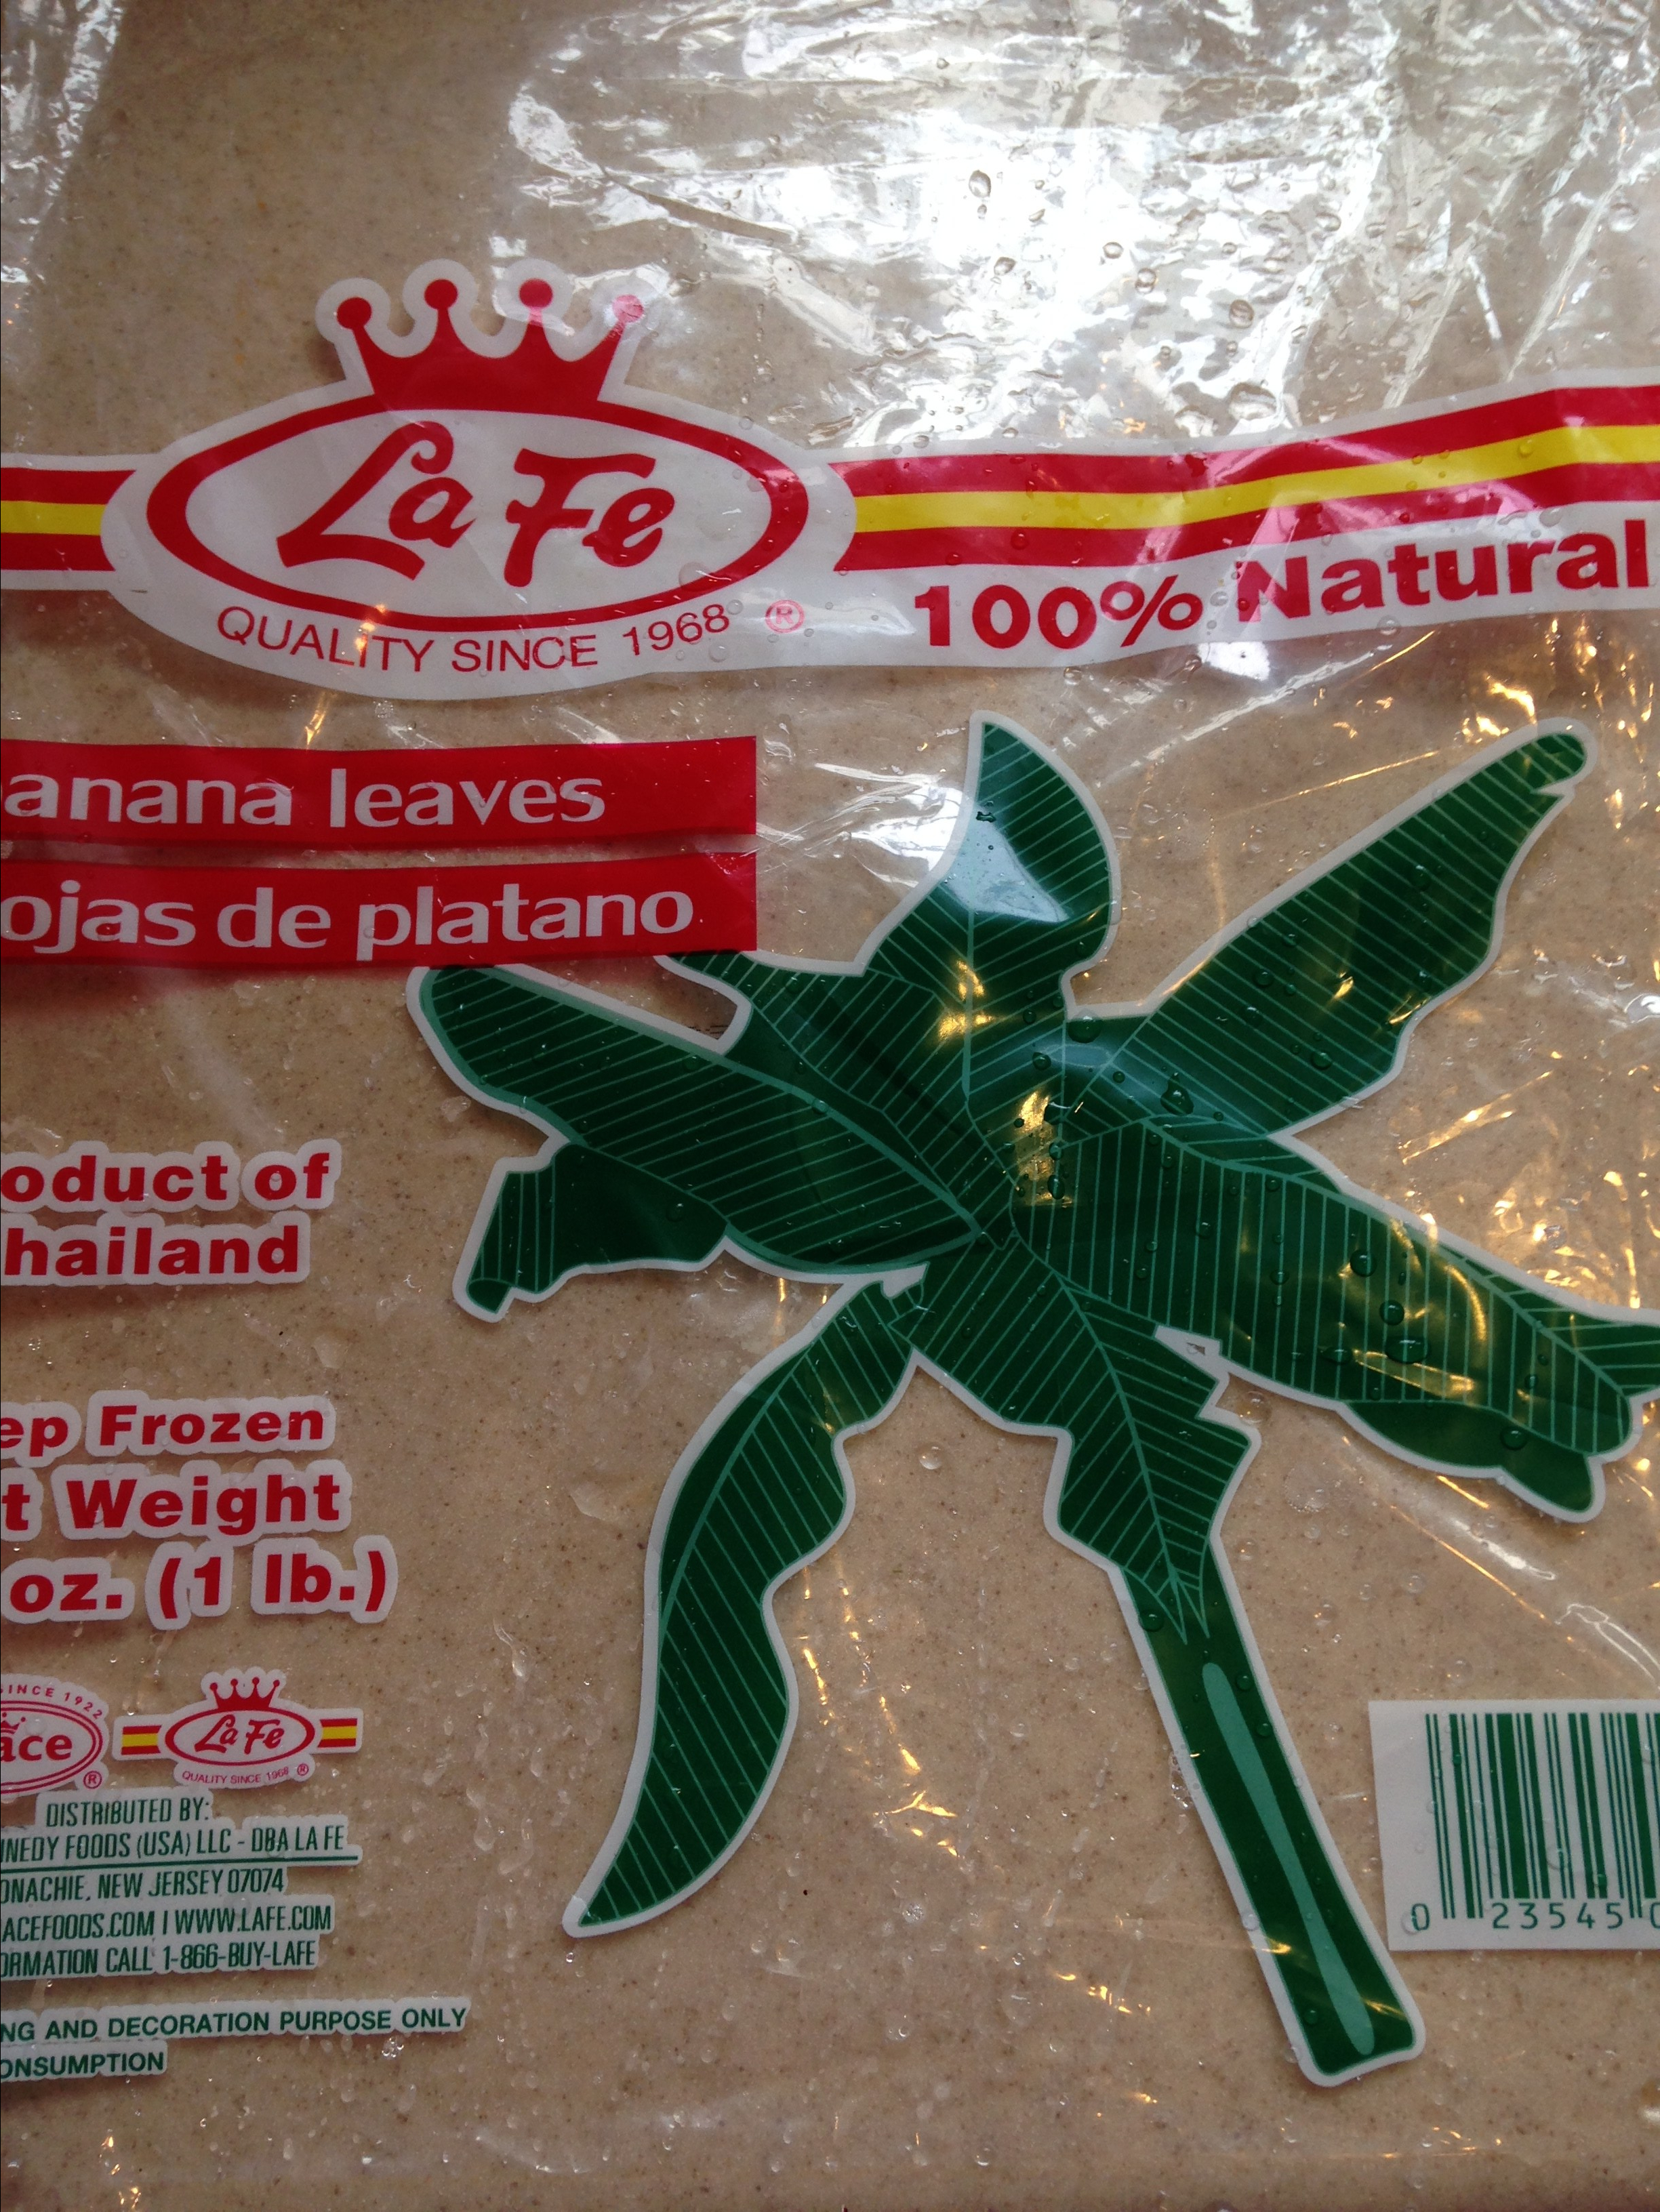
Step Four – Cut the Banana Leaves
Unravel a package of banana leaves and rinse them well in clean water. Pat dry with paper towels. Cut each leaf into 6-8” sections. Tear pieces of aluminum foil into 8-9” sections. Stack the leaves and foil together so that each piece of banana leaf rests on a sheet of foil. Make sure the shiny side of the leaf is against the foil.

img_4283-e1501516024911.jpg


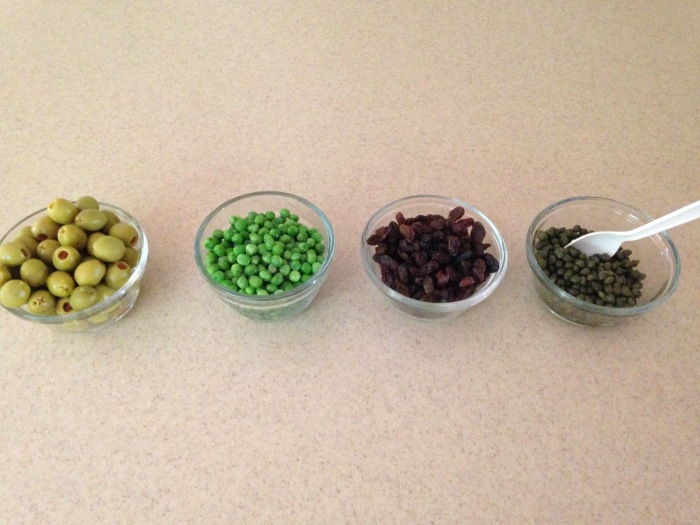
Step Five – Line up the Filling
Pour into separate bowls a jar of olives, a jar of capers, a cup of green peas, and a cup of raisins. You’ll also need your pan of rice and potatoes as well as the pot of meat and the cornmeal mixture.

IMG_4275

Step Six – Assemble the Tamales
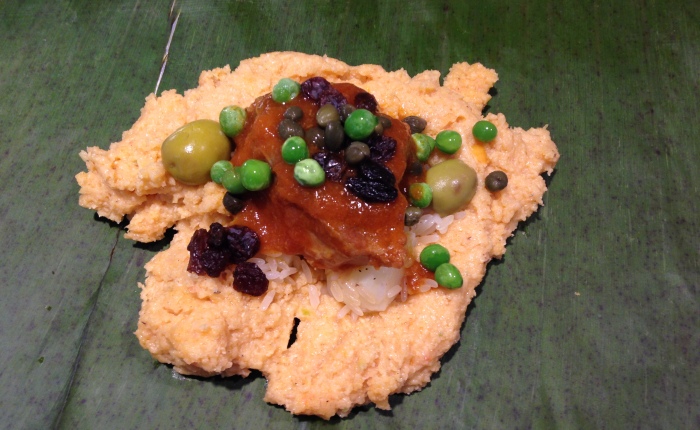
Lay one banana leaf segment on its foil in front of you. Spoon about 1/2 cup of cornmeal into the center of the leaf and flatten it slightly with a spoon (or fingers). Place a small chunk of pork and some of the sauce onto the cornmeal. Add a spoonful of the rice/potato mixture, 2 olives, a few raisins, and a few capers and peas. Starting from one corner, roll the Tamale into a tight cylinder. The foil should keep it closed.

IMG_4281

Sidenote: In Honduras they don’t use the layer of foil. There is another part of the banana plant used as string to tie the rolled banana leaves up into a tight little packet. I guess you could also use string, but the foil worked great.

Step Seven – Cook the Foil Packets
Tightly pack the foil packets vertically into the bottom of a large pot. Pour boiling water into the pot. It should come up to the top of the foil ends. Bring the pot up to a boil, lower heat and cook covered for about one hour. After an hour, open and test the inside of one Tamale for doneness. The rice should be cooked. Hopefully you will end up with so many Tamales, you’ll need to cook them up in 2-3 batches! That’s what we did.

img_4282.jpg

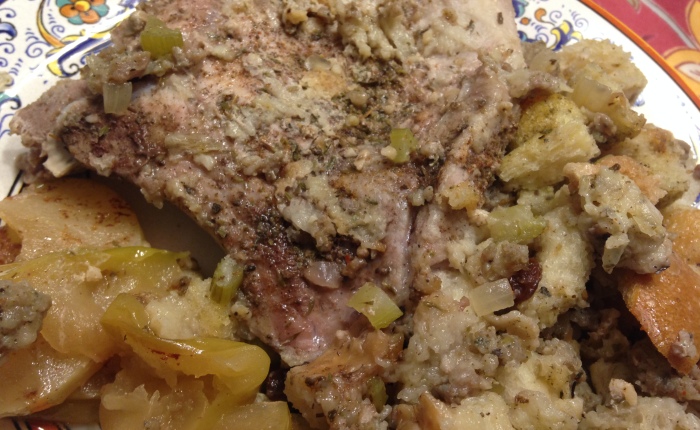
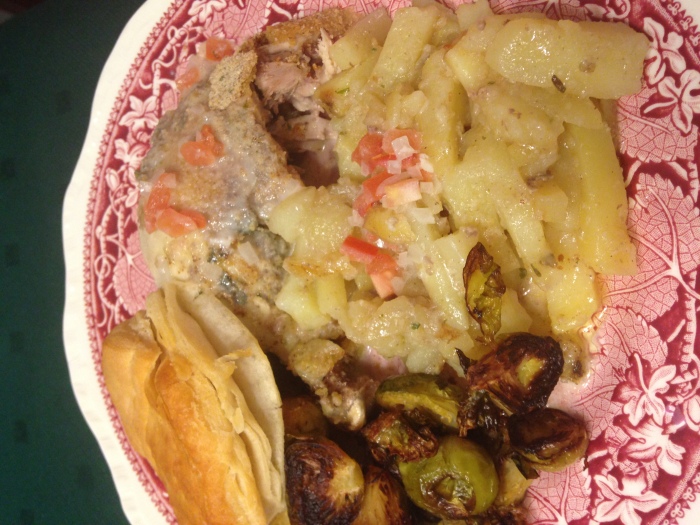
Step Eight – The Best Step – Eating Tamales!
You can either serve your hot Tamales right away, or save them for later. I reheated mine by placing several in a baking dish and baking at 350 degrees for about 20-30 minutes (or until hot). They are better the next day after all the flavors have had a chance to love on one another!

We made about 40 Tamales.

IMG_4290

My friend was right….making Tamales took us all day! But as a group activity it was a blast. We used the boiling time to eat lunch and we laughed and talked the entire time. I don’t speak a word of Spanish, but since cooking is an international language, her mom and I had no trouble communicating!

I hope you give Honduran Tamales a try. If you make a different version, feel free to share your recipe below!

Next on my bucket list is to meet up with a few friends from El Salvador and learn how to prepare pupusas!

All the best!
Brad

Chicken Kabobs for Father’s Day – Pass the Meat!

Chicken Kabobs for Father’s Day – Pass the Meat!

When I last blogged, it was to share pictures from a delightful Crepe Cake I prepared for a Mother’s Day gift. Yesterday, I invited a few father friends over to burn meat and relax over a few beers.

Kabobs are a great option when serving a group. A little meat goes a long way! And I was able to gather up a variety of veggies and grill them up for a colorful and delicious meal. Another things I really like about kabobs is that you don’t have to prepare a lot of side dishes because everything you need is on the skewer! All I added yesterday was watermelon and a side of baked beans. They guys were happy!

IMG_4271

Chicken Kabobs the Easy Way!

If you’ve read any of my past posts, you know I am hooked on Aldi’s for most of my shopping. It saves a ton of money and they carry a lot of neat things not found at most grocery stores. I think that’s because they originated in Europe, so the selection of some German food stuffs is pretty darned good.

To make a long story short, I purchased at Aldi’s two packages of marinated cilantro-lime boneless chicken breasts and cubed them up for the meat. Easy, right?!?!

IMG_4264

Veggies

I basically dug through my fridge to grab everything else added to the kabobs.

Sliced golden potatoes
Shallots
Baby rainbow bell peppers
1 orange bell pepper
Zucchini
Yellow summer squash

IMG_4265

Directions

Skewer the cubed meat and vegetables in any order. Lay onto a preheated grill and turn regularly until the chicken is cooked and the veggies have a nice char. Serve hot.

Happy belated Father’s Day mates! I hope you enjoyed your afternoon.

If you have any favorite kabob marinades or kabob recipes, send me the link below. I’d love to try them!

IMG_4272

Buon appetito!

A Crepe Cake for Mother’s Day

A Crepe Cake for Mother’s Day

I’m friends with a few moms and wanted to treat them to a special treat on Mother’s Day. I looked through several recipes and settled on a Crepe Cake. I’d never made one before, but I’ve whipped up plenty of pastry creams and millions of pancakes so I figured it would be a cinch!

IMG_4178

Okay, truth be told, it was not exactly a “cakewalk!” I had a few layers slide this way or that. It may not be as pretty as a pro would bake, but it tasted like a slice of heaven. And the moms I shared it with were amazed!

Step One: Make the batter.

Crepe Batter
6 tablespoons unsalted butter
3 cups whole milk
6 eggs
1 1/2 cups flour
7 Tbsp. sugar
1/8 tsp. salt
vegetable oil

Directions

Make batter several hours in advance.
Melt butter in a small pan until it turns medium brown.
Separately, heat milk until steaming I used a microwave).
In a stand mixer beat eggs, flour, sugar, and salt on medium speed. Slowly add the slightly cooled milk and browned butter.
Pour into a container with a spout and refrigerate for several hours.

Step Two: Make the cream filling.

IMG_4181

Pastry Cream

2 cups whole milk
1 Tbsp. pure Madagascar vanilla (my personal favorite)
6 egg yolks
1/2 cup sugar
1/3 cup cornstarch
3 1/2 Tbsp. unsalted butter

Directions

Bring milk to a boil in a heavy bottomed saucepan. Remove from heat and stir in the vanilla.
Fill a large bowl with ice and set aside as an ice bath for the finished cream.
In a separate heavy-bottomed pan, whisk together the egg yolks, sugar, and cornstarch. Gradually whisk in the hot milk and bring to a boil over medium high heat. Whisk constantly 1-2 minutes.
Scrape into a small bowl. Set the bowl in the ice bath and continue stirring until the temperature drops to 140 degrees. Stir in the butter. When completely cool, cover and refrigerate.

Before you assemble the layers:

2 cups heavy cream
1 tablespoon sugar
3 tablespoons Kirsch

Whip the heavy cream, sugar, and Kirsch (optional – you can substitute vanilla, another sweet liquor, or even almond flavor). Fold into the chilled pastry cream with a spatula.

Step Three: Make the crepes

Bring the batter back to room temperature.
Place a 9-inch crepe pan (or non-stick) over medium heat. Brush with oil.
Pour about 3 tablespoons batter into hot pan and swirl to cover the surface.
Cook until the bottom just begins to brown, like a pancake, then carefully peel back and flip. Cook on the other side for 5 seconds.
Flip the cooked crepe onto a piece of parchment paper.
Make 20 useable crepes. (I ate my mistakes as I went!)

Step Four: Assemble the Crepe Cake

IMG_4180

Place 1 crepe on your cake plate. Cover with a thin layer of pastry cream (about 1/4 cup). Add crepe #2. Repeat steps until you finish with the last crepe on top.

Chill for at least 2 hours.
Set out for 30 minutes before serving.
Slice and serve with fresh fruit.

IMG_4175

I must say, this was one of the most time-consuming cakes I’ve ever made, but it was well worth the effort! Let me know if you have any other variations on the Crepe Cake. I have a feeling that these babies get better with practice!

Buon appetito!

Brad

Fresh Tomato Sauce Using My Food Mill

Fresh Tomato Sauce Using My Food Mill

I love the taste of pasta tossed with fresh tomato sauce. It’s one of those guilty pleasures in life worth the time and effort. Even though it’s not exactly fresh tomato season, you may want to save this article for a day this summer when you are wondering what to do with that bushel of ripening tomatoes. The beauty of tomato sauce is you can use bruised and even slightly over ripened tomatoes.

If you use several varieties of tomatoes your sauce will have a richer flavor. Another way to add flavor depth is to roast some or all of your tomatoes first. I sometimes opt to roast cherry tomatoes before adding them. They take far less time to roast.

One question I get asked a lot is whether I go to the trouble of peeling all the tomatoes before I cook with them. The answer is no. That’s because I use a food mill which removes all the peelings for me!

Ingredients

10-15 pounds fresh tomatoes
fresh basil
salt
pepper
crushed red pepper (optional)
sugar (optional, helps cut the acid)

Directions

Chop tomatoes into large chunks and add to large stock pot.

fresh chopped tomatoes

Cook down on medium heat for 45-60 minutes. This time will vary depending upon how much water is in your tomatoes and how thick you like your sauce.

In batches, run cooked tomatoes through a food mill to remove all skins and seeds.

food mill tomato sauce

Add seasoning (whatever you prefer) and simmer 10-15 minutes longer.


fresh tomato sauce with basilCook pasta in salted water to desired doneness. I prefer some bite to my pasta.

Toss hot pasta with sauce. Taste and season as needed. Top with freshly grated parmesan cheese and serve immediately.

brad nierenberg rigatoni recipe

Less is more when it comes to fresh tomato sauce. But that’s just my opinion! If you’ve never used a food mill, they work great for sauces and soups. And, if you are ambidextrous, it counts as an arm workout too!

What’s your favorite way to prepare tomato sauce?

Experience the True Culture and Cuisine of Italy – Stay in Italian Farm Hotels

Experience the True Culture and Cuisine of Italy – Stay in Italian Farm Hotels

I have a few friends visiting Italy this spring and wanted to share some of my insight. I was lucky enough to spend close to two years living in Northern Italy back in the early 2000s. I loved it. How could you not?!?!

Caschina Barac35

Travelers flock to Italy every year to enjoy the beauty, the art, the history, and the food and wine. Unfortunately, most tourists focus on the large cities like Rome, Florence, Milan, and Venice, missing the opportunity to immerse themselves in the daily life and culture of this wonderful country.

Food is a central aspect of Italian culture and it differs from region to region and even town to town. One way to get a taste of both the food and daily life throughout Italy is to avoid hotels inside city boundaries and book reservations at an agriturismo or two. These visitor-friendly working farms are located in the countryside. They range in cost and amenities. Most include breakfast and some book dinner reservations as well.

Dining at an agriturismo is a culinary delight. The menu features seasonal local ingredients, including a few raised right there on the farm. Visitors will experience the cuisine of that particular region.

Caschina Barac29

If staying in the Piedmont, truffles may find their way onto the menu along with a hearty barolo wine if you are lucky! The stunning Cascina Barac is one such farm hotel, set in the vineyard. Visitors can book reservations for a gourmet meal, taste their wines, and even tour the family-owned winery. I still make the shaved carrot recipe I was served there. The owner wrote it down for me on the back side of a business card which holds a place of honor in my recipe box to this day!

Agri-Macinello

Is Florence on your list? I stayed at the Macinello in Montegiridolfi to visit the region. Make sure you get over to Greve for some Chianti! There is also an American cemetery nearby well worth a visit.

Venice is located north of the province of Emilia-Romagna of the famed pasta bolognese, parmigiano-reggiano cheese, and lambrusco and sangiovese wines. Why not book reservations at a local agriturismo and use it as your base to visit Venice, Ravenna, Modena and other beautiful cities?

Umbria is another region in Italy often overlooked by American tourists, but honestly it was one of my favorites. Perugia (yes, the chocolate is named after this old city), Spoleto, Assisi, and many other beautiful hillside towns dot the countryside.

DSCF0091

I stayed at the La Quercia Gentile in Valfabbrica as my base. The owners were so nice that upon leaving they gave me a big bottle of their own olive oil to try! The region is known for its Pecorino cheese and egg pasta. Sangrantino and Orvieto are the regions most popular wines.

To really experience Italy, get out into the countryside. Book a room or suite at a farm hotel. Chat with the owners over a meal. Investigate the little villages and sip a cappuccino from the local bar. Hike. Meander. And eat where the locals dine. This way you will experience the true Italy.

Visit the website Agriturismo website to investigate properties and book your reservations.

Diet Detox – Cinnamon Rolls and Cupcakes

Diet Detox – Cinnamon Rolls and Cupcakes

I’ve had to dial back my love of home cooking for a couple of months. I need to take off about 10 pounds and so am avoiding time in the kitchen until mission accomplished. I’m trying to cook and eat healthy options, but so far am uninspired to share anything of note. I’m keeping my eyes peeled for some great looking and tasting dinners and hope to be back to my culinary roots soon!

But, as you can see by the title, I took a vacay from dieting yesterday to celebrate a friend’s birthday and thought I would share some pics and tips. After all, if you are going to fall of the dieter’s wagon, you may as well fall hard!

The morning started out with some cinnamon rolls. I confess I kind of cheated. They were a last minute idea and I used what I had in the freezer, frozen bread dough, which had been tucked away as forbidden food for the past few weeks.

I thawed two loaves overnight in the refrigerator, then got to work in the morning. No recipe is required. This is one of those “wing it” recipes!

Ingredients
2 loaves frozen bread dough
4 ish tablespoons softened butter
Cinnamon
Brown sugar

img_3989

Directions

Roll out softened bread dough into two rectangles. Spread with softened butter, leaving about 1/2-1/4″ border all around edges. Spring liberally with brown sugar and cinnamon while retaining the same clean border. Roll and seal the ends. Slice and place in a buttered baking dish.

Cover with a clean dish towel and set in a warm place to rise for 30 minute. Please in a pre-heated 350 degree oven for about 30 minutes or until done. (I use the “touch with finger for doneness” test).

img_3991

Eat while warm. That’s it!

Chocolate Cupcakes with Peanut Butter Frosting

img_3996

There is no hidden secret to these delicious cupcakes. I just wanted to share a couple of photos. I used a boxed chocolate cake mix and Ina Garten’s peanut butter frosting. Her frosting recipe is one of my favorites. It is so creamy and delicious and always gets loads of  compliments.

All 24 cupcakes were eaten in a flash. Thank goodness, because today I am back on the bandwagon.

Bon appetito!

Pork Chop Casserole – A Comfort Food Favorite

Pork Chop Casserole – A Comfort Food Favorite

I love pork chops. They are inexpensive and delicious as long as you don’t cook the dickens out of them.

We grew up eating pork chops fairly often because of the low cost. My favorite way was with stuffing and applesauce on the side. I stumbled across a recipe from one of my most tattered cookbooks the other day that put the stuffing, apples, and pork chops all together for a very easy to prepare (and tasty) casserole of sorts.

I made a few alterations of my own which I explain below. For the original Betty Crocker recipe (which is hard to improve upon) you can visit their website which is probably a bit easier than borrowing my cookbook!

img_3820

Ingredients
1 Tbs butter
3 Granny Smith apples, sliced
1 tsp. brown sugar
1/4 tsp. cinnamon
salt, pepper, garlic, sage, paprika, thyme, all spice
4-6 pork chops

Your own recipe for stuffing or use mine: 
4-6 cups cubed stale bread (I prefer sour dough)
1 pound bulk breakfast sausage with sage browned and drained
celery and onion diced and sautéed in 3-4 Tbs. butter until soft
1-3 cups chicken stock (enough to moisten)
1/4-1/2 cup raisins or dried cranberries
1 egg, beaten
salt, pepper, poultry seasoning, sage, fresh parsley

Mix these ingredients together until moist (not mushy) and keep tasting for right amount of seasoning.

Directions

img_3814

Brush 1/2 teaspoon butter in bottom of 13×9-inch baking dish. Spread apple slices in dish. Sprinkle brown sugar and cinnamon over apples.

img_3816

Season the pork chops with whatever spices you prefer and lay on top of apples. I used a combination of salt, pepper, garlic, sage, paprika, thyme, and all spice.

img_3818

Cover pork shops with stuffing.

img_3819

Cover with foil and bake at 375 degrees for 40-50 minutes. Uncover and bake 10-15 minutes longer until you get a nice browning on the stuffing.

See how easy that is! Enjoy!

Spicy Chicken A La Diable Is A La Delicious

Spicy Chicken A La Diable Is A La Delicious

Le French Oven cookbook cover

Many thanks to a good friend who gifted me Hillary Davis’s “Le French Oven” cookbook for Christmas this year. The photos are gorgeous and I could not wait to dive in and try one of the recipes right away.

All I needed was a French oven (which I do) and a sous chef (that would be me). Most of the ingredients for this divine dish were already in my pantry and refrigerator.

Full disclosure: I know Hillary Davis’s version would be much better looking. But I intend to get better with practice!

Let me first say this chicken dish is divine. The flavors were so good I wanted to lick my plate. My dinner companions called it the most delicious chicken and biscuits they’d ever had.

Hillary Davis gets full credit for the recipe and the instructions. The photos are all mine!

Spicy Chicken A La Diable

Ingredients
1 whole chicken (organic preferred)
2 sprigs fresh tarragon
2 Tbsp olive oil
2-4 potatoes peeled and sliced into matchsticks (1/4 inch)
Salt and pepper to taste
3 Tbsp stone ground mustard
1/4 tsp. cayenne pepper (I only used 1/8 tsp.)
1 tsp. honey
1 tsp. dried thyme
1/2 cup seasoned bread crumbs (I wish I had made my own rather than using store bought)
2 Tbsp minced shallot
1/4 cup white wine vinegar
1/4 cup dry white wine (I used Riesling)
1 1/2 cups chicken stock (I used homemade)
2 large cloves garlic, minced
1/2 tsp. salt
1/2 tsp. Dijon mustard
1/8 tsp. cayenne
1/2 cup heavy cream
1 medium tomato diced (I used 2 Romas)

Directions

img_3901

Pour 2 Tbsp olive oil into French oven. Toss in potatoes with salt and pepper. Place cleaned chicken onto potatoes. Rub with olive oil and season with salt and pepper.

Bake at 400 degrees 15 minutes per pound.

img_3903

While the chicken is cooking whisk together sone ground mustard, cayenne, honey, and thyme. (I misread the instructions and also whisked in the tarragon. It still turned out great.) Set mixture aside.

When chicken is ready, remove it from the oven and spread the mustard mixture all over it. Sprinkle breadcrumbs over the mustard paste and pat them down.

Return the chicken to the oven and roast for 15-20 minutes longer. The thermometer should read 165 degrees F. My breadcrumbs were starting to get too brown, so I put the lid on for the last 5 minutes.

Move the chicken and potatoes to a large platter.

img_3909

Place the French oven on the stovetop. Add the shallot, vinegar, wine, half the tarragon and bring to a simmer for 5 minutes. Add the stock, garlic, 1/2 tsp. salt, Dijon mustard, 1/8 tsp. cayenne, and heavy cream. Simmer 10-15 minutes longer.

Just before serving stir in the remaining tarragon and the tomato (seeds and juices as well). Cook 2 minutes longer.

img_3912

To serve, ladle sauce on a plate and top with chicken and potatoes. I served it with roasted brussels sprouts and biscuits.

I hope to try many more of the great-tasting recipes in this new cookbook. I’ll keep you posted!

Celebrate New Year’s Eve on the Cheap

Celebrate New Year’s Eve on the Cheap

Everyone loves a good New Year’s Eve celebration. But playing host on New Year’s can put a real dent in your wallet.

I recently spoke with Leanne Italie and shared a tip or two on how to keep your budget in check on New Year’s. She shared my tip along with those of a few other folks. You can read the article here.

Hope you find few ideas you can apply to your own celebration!

New Year's Eve decorations

Create your own decorations. As you can see here, I collected some empty wine bottles and spray painted them for center pieces. I added some tree branches from my back yard and ornaments from The Dollar Store.

Skip the champagne. Use ginger ale! You can enjoy a festive glass of sparkling ginger ale at the stroke of midnight. That way everyone can drive home safely. As long as small children are not present, add a small handful of fresh cranberries to each glass before adding the beverage for some holiday color.

Make it a potluck. There’s no reason why the host must do all the cooking. Ask everyone to bring a dish to pass. And if you don’t want to end up with 20 crockpots filled with meatballs, assign people to food categories. That way they can make what they want within the category.

I only mention meatballs because the first time I hosted a New Year’s Eve party many years ago, as a joke, everyone brought meatballs. At least we did not go hungry!

Have fun planning all of your holiday get togethers! If you have any creative ideas for planning a low budget celebration, share your thoughts below!


If You Amore S’mores – Try Peanut Butter S’more Bar Cookies

If You Amore S’mores – Try Peanut Butter S’more Bar Cookies

Sorry for the horrible twist on words in this title. I couldn’t help myself! But seriously, these cookies are outrageous. You may not want to tell your dentist or dietician you’ve eaten Peanut Butter S’more Bars because the sugar content is off the charts. Just sayin’!

I want to give credit to the bloggers who led me to these wonderful cookies.

I follow Six Sisters’ Stuff. Their roundup posts on baked goods always include some keepers. I’ve struck gold many times and last week was no exception. They linked to a recipe by Melanie who writes The Sweet Life. Her recipe is wonderful just as it and I encourage you to visit her site and try the original recipe. I made a few small tweaks to Melanie’s recipe and this was my end result.

Buon appetito!

Peanut Butter S’more Bars

Ingredients
1/2 cup unsalted butter, room temperature
1/2 cup packed brown sugar
1 egg, room temperature
1 tsp. vanilla
1 1/4 cups flour
1 tsp. baking powder
1/4 tsp. salt
1 1/2 cups crushed graham crackers (about 1 1/2 packs)
2 large bars Reese’s Peanut Butter Cup bars
1 small jar marshmallow fluff

Directions

s'more cookie dough

Using paddle attachment, beat butter and brown sugar until fluffy. Add vanilla and egg and continue beating until incorporated. Add salt, baking powder, flour, and graham crackers crumbs. Mix until incorporated.

img_3842

Press 1/2 of dough into the bottom of a buttered 8×8 baking dish. Lay individual squares, evenly placed in four rows on top of dough. Press in slightly to keep them from shifting.

img_3845

Spread a layer of marshmallow fluff over the peanut butter squares.

img_3846

Scoop remaining dough onto the top of the fluff layer and carefully spread out to cover entire layer. Tip: An offset knife works great for spreading!

Bake for 30-45 minutes at 350 degrees or until the center of the top layer is cooked. Cool and cut into squares.

img_3849

I have no clue on the calorie content for these bad boys. Make sure you have a glass of milk handy! If these are too sweet for your liking, try my Chocolate Pillows which use a spritz dough and are not quite as sweet!